All In One WP Security & Firewall Setup Guide 2019
Before we dive into setting up WordPress security with All In One WP Security & Firewall plugin, let’s have a bit of background of my current setup. I’ve created my own website using WordPress, acquired my domain name from GoDaddy and launched my WordPress site on Bluehost. Honestly, setting up your own website and maintaining it is not that easy. It is given that you will experience a lot of difficulties specially if you’re new in web development industry. You may encounter technical problems, maybe on your hosting, in WordPress itself, SEO, website security (our main topic) etc. Those are just normal and you shouldn’t be overwhelmed. There’s a lot of forum out there in the internet where you can read, learn and ask people for help. Just always focus on purposes why you have created your website at the first place.
In this 20-30 minutes read article we will focus only on setting up WordPress security using All In One WP Security & Firewall. I will explain each and every feature of this security plugin and will give you details as much as I can about how each functionality works. Grab your coffee and let’s get down to the business!
Why Is WordPress Security Important?
We all know that WordPress is a very popular CMS framework. It is amazing that it empowers 74.6 million plus of websites all over the world. Until now WordPress community still rapidly growing. This framework constantly releases updates to optimize its performance, add features, fix bugs and tighten security. The team behind this framework knows that hackers of nowadays are more aggressive when creating malwares and form other type of attacks (specifically for WordPress). Hackers continuously improving their way of hacking because they know the worth of it thus not all WordPress site owners know how to apply WordPress security. That’s why WordPress team really value security. They continuously testing the framework, searching for potential security breach and releasing security updates.
Neglecting to setup security to your WordPress site could lead to a potential disaster. Let’s say you’re an eCommerce business (who uses WordPress) creating real success in the internet. You should pay attention on protecting one of the most precious asset of yours — your WordPress site. A hacked website can cause real damage to integrity and reputation of a business. Hackers could install malicious software to your site and steal your data (and your users data). If google detected that your site contains malware, they will put it in blacklist. In simple words, a hacked website can completely kill a business. Like what others have said, “prevention is better than cure”. Don’t focus on “how you will retrieve your hacked website?”. Focus on “how you will make your WordPress site secure?”.
Introduction to All In One WP Security & Firewall
All In One WP Security & Firewall is an antivirus plugin for WordPress, developed by Tips and Tricks HQ (Peter Petreski, Ruhul and Ivy). This security plugin has outstanding profile in WordPress plugin marketplace (having 700,000+ active installs and 5 star rating review!). It is well documented, supports 8 languages and have active support that continuously improving the software. Why would you choose All In One WP Security & Firewall? Let’s start from this list of major features of this security plugin.
- Built for WordPress beginners and advanced developers (firewall settings are categorized into “basic”, “intermediate” and “advanced”)
- Security features properly organized into pages and tabs (guide for each feature also provided)
- Scans your site (files and database) to check vulnerabilities and potential security breaches
- Implements latest recommended WordPress security practices to protect your site against old and new type of web attacks
- 100% free
- User account (user login and user registration) security
- Database security
- File system Security to protect your files (from accessing and updating without permission)
- Firewall (we’ll discuss it in detail later)
- Other features will be discussed in detail after we set up security plugin
Before You Setup All In One WP Security & Firewall Plugin
All In One WP Security & Firewall plugin is not about enabling all security options then leave and relax. Before I’ve come up to this ultimate guide, I’ve been through to hassles. I installed and activated the plugin (I’ve been amazed by tons of features that you may enable here). So I set it up, tweaked some settings, messed around till the security strength meter turns into a meter gauge of a full throttle car. I get back to my site and I tried to reload my page. Guess what happens to my website? Most of the pages returns 404 error, images and other resources failed to load. I didn’t know what just happened and I don’t have a choice but to deactivate this plugin.
After deactivating the plugin (just to confirm it is the cause of the malfunctions), it fixed all the errors and everything gets back to normal. I tried to re-activate the plugin and saw this notification from WordPress dashboard.

Would you like All In One WP Security & Firewall to re-insert the security rules in your .htaccess file which were cleared when you deactivated the plugin?
I don’t have time to decide so I just hit the button Yes. Then the errors persists again (sigh). This is just a reminder that not all features of All In One WP Security & Firewall are meant to be enabled by anyone. Each and every features included here has its own use and purpose. Some may suits your need and some may not. Be aware that some of the plugins you’re using may behave differently when enabling/disabling security options. I strongly suggest you to backup your WordPress site (files, database and your .htaccess) first before you setup All In One WP Security & Firewall.
Install And Activate All In One WP Security & Firewall
From left sidebar of your WordPress dashboard, hover your mouse to plugins tab and click Add New. Search for “All In One WP Security & Firewall”, from Search Results you should see this plugin by Tips and Tricks HQ, Peter Petreski, Ruhul, Ivy. Click Install Now button.
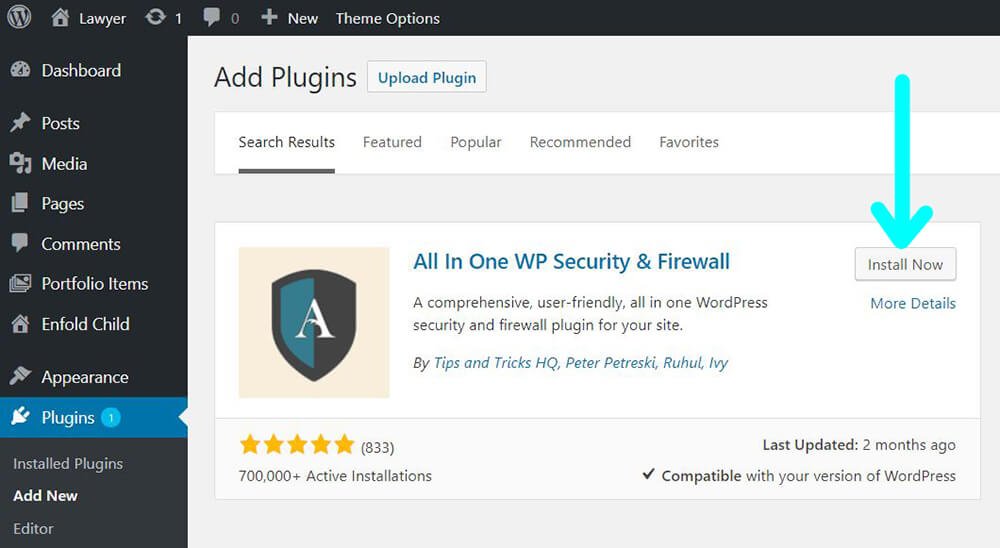
Install All In One WP Security & Firewall plugin
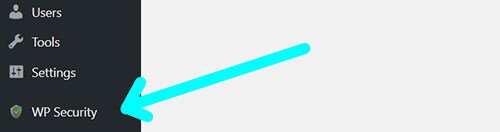
Activate the plugin after installation. “WP Security” tab should be visible now from your admin panel sidebar.
All In One WP Security & Firewall plugin activated
You can also download All In One WP Security & Firewall here and manually upload and extract all-in-one-wp-security-and-firewall.zip in your /wp-content/plugins directory. Activate the plugin after you have extracted the zip file.
Setup All In One WP Security & Firewall
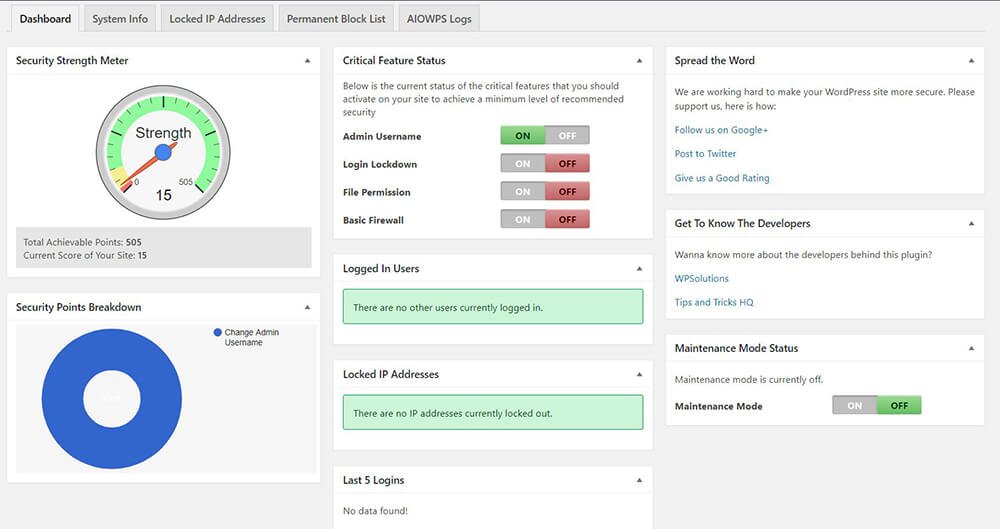
From your WordPress dashboard, navigate to “WP Security” tab. You should see your dashboard similar to this.
All In One WP Security & Firewall dashboard
Dashboard
Hover your mouse to WP Security tab and click Dashboard.
Dashboard Tab
From the dashboard of All In One WP Security & Firewall, you will notice a Security Strength Meter widget (looks like a meter gauge). It simply measures how secure your site. Currently the highest achievable score is 505 points. You may ask how does this plugin compute security score? Well this plugin considers a lot of variable before it tells whether your site is secure or not. You can get security points by enabling Login Lockdown, Registration Captcha, Basic Firewall, 5G/6G Blacklist, Block Spambots and many more from security settings. We haven’t setup any securities yet that’s why we only got 15 points as our current score.
You must also take attention to Critical Feature Status widget. Later we’ll activate critical features to achieve a minimum level of recommended security. We will change Admin Username, enable Login Lockdown, change File Permission and enable Basic Firewall.
Security Points Breakdown widget shows you all enabled security in doughnut chart. Hover your mouse to specific security from the chart to see how much security points it adds to your Security Strength Meter.
Other helpful widgets are:
Logged In Users – to see other users that is currently logged in.
Locked IP Addresses – to display IP Addresses that is currently locked out.
Last 5 Logins – to show details of last 5 logged in users.
Maintenance Mode Status – this widget will redirect you to a page that will allow you to enable/disable front-end lockout. You may set your message via WYSIWYG editor. If you enable maintenance mode, users with super admin privileges would still have access to your site’s front-end.
System Info Tab
System Info displays technical details about All In One WP Security & Firewall, your WordPress, plugins you’re using, PHP, your MySQL database and your host.

Site Info

PHP Info

Active Plugins
Locked IP Addresses Tab
Locked IP Addresses tab list out all temporarily blocked IP addresses. Failed login attempts may cause for the IP Address to be locked out if it exceeds maximum login retries. This is an effective solution to avoid brute force login attack. Later we will try to setup Login Lockdown feature.
Permanent Block List Tab
Permanent Block List tab shows all IP addresses added via SPAM Prevention feature option. An IP address may be permanently blocked if it exceeded a certain number of comments labelled as spam.
AIOWPS Logs Tab
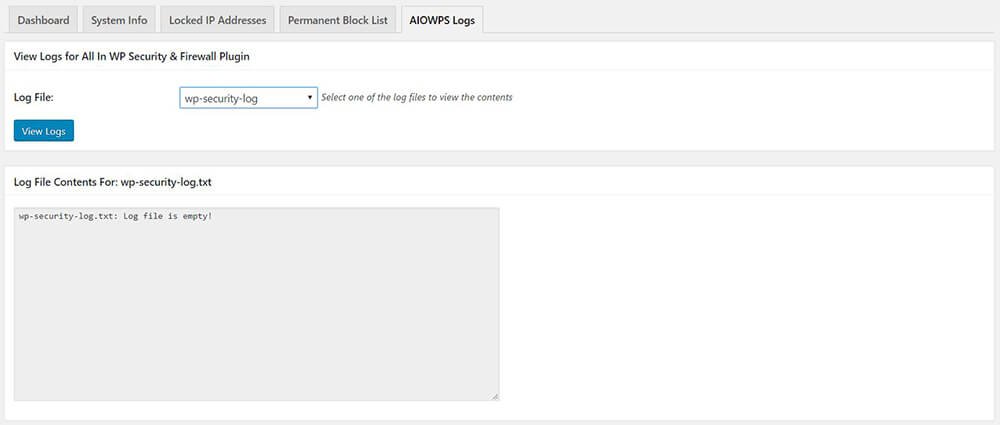
AIOWPS Logs
Navigate to AIOWPS logs tab to show logs for All In One WP Security & Firewall plugin. Select log file to view (choose between wp-security-log and wp-security-log-cron-job) and click View Logs button. This is a helpful feature to analyze events that occur in your WordPress site.
Settings
Hover your mouse to WP Security tab and click Settings.
General Settings Tab
Some of your plugins may cause to malfunction when enabling security features. You may disable all security options by navigating to General Settings tab Disable Security Features section and clicking the button disable all security features.

Disable Security Features
From Disable All Firewall Rules section, with a single click you can disable all firewall rules such as basic firewall protection, WordPress XMLRPC & Pingback vulnerability protection, 5G/6G Firewall Protection and many more.

Disable All Firewall Rules
You don’t need to go through each tab just to disable all security options when debugging. With single click you can disable all security options or firewall rules to verify if there’s a conflict between this security plugin and the other plugin/s you’re using.
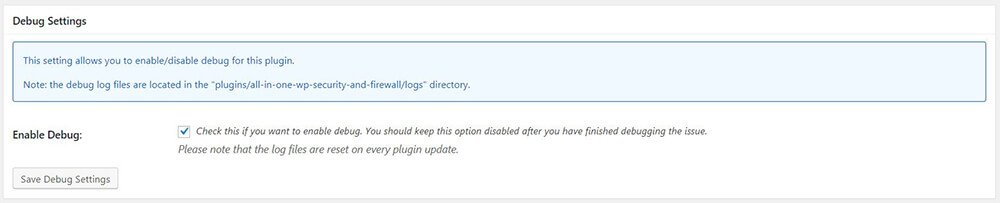
Debug settings
You may also enable debug for this plugin. When you enable debug from Debug Settings section, all the events happening with this plugin will be logged. You may analyze your debug log file from your /plugins/all-in-one-wp-security-and-firewall/logs folder. This is very helpful when debugging an issue.
.htaccess File Tab
Your .htaccess file is a configuration file used by your web server — Apache. It alters Apache’s default configuration. This type of file is hidden and located within the root directory of your project folder.
We should know that All In One WP Security & Firewall simply write rules from your .htaccess file. It simply add, edit or remove lines from your .htaccess when you’re enabling/disabling security options. In fact, you can manually modify your .htaccess file to enable/disable security features.
Before enabling/disabling security features you must backup your .htaccess file first. From Settings navigate to .htaccess tab. From Save the current .htaccess file section you should see a button that says Backup .htaccess file. Click the button to save your .htaccess file inside of /wp-content/aiowps_backups directory. Download your .htaccess file using FTP solutions such as FileZilla.

Save the current .htaccess file
In case your site URL’s misbehaving, you can easily restore your backed up .htaccess file to verify that there is something wrong with your current configuration.

Restore from a backed up .htaccess file
wp-config.php File Tab
Your wp-config.php file is the base configuration of your WordPress site. It contains important information such as your database details and some MySQL settings. You can locate your wp-config.php file from root directory of your WordPress site folder.
From wp-config.php File tab you can easily backup (will be downloaded directly from your computer) and restore your wp-config.php file.

Save the current wp-config.php file

Restore from a backed up wp-config file
WP Version Info Tab
By default, meta data of your WordPress site can be easily view from browser developer tools. Try to open developer tools (Ctrl + Shift + J if you’re using Google Chrome) and search for ‘WordPress’ or ‘jquery’.
![]()
WP Generator Meta Tag & Version Info

Other Resources Version Info
Having specific version details of technology you’re using is a big help for hackers to determine vulnerabilities and security holes from your site.
Thanks to All In One WP Security & Firewall for having this Remove WP Generator Meta Info feature. From WP Generator Info section check Remove WP Generator Meta Info. Click Save Settings button for feature to take effect.
Import/Export Tab
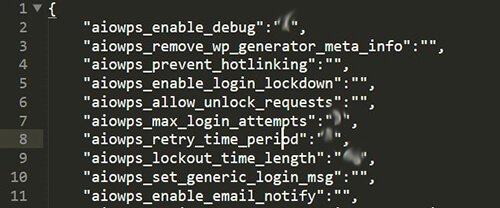
With Export AIOWPS Settings, you have an opportunity to setup a standard security setting for your WordPress site and export it to a file. Exported file could be imported from any other WordPress site. This feature would be also helpful if you want to restore other or previous settings you’ve setup.
Go to Import/Export tab and click the button that says Export AIOWPS Settings to export your All In One WP Security & Firewall current settings.

Export AIOWPS Settings
Your exported file should be similar to this (a set of key pair values).
All In One WP Security & Firewall settings exported file
Using this plugin, you can also import your All In One WP Security & Firewall settings. Scroll down to Import AIOWPS Settings section. Click the button that says Select Your Import Settings File. Locate and select your exported file. After the file has been uploaded click Save all changes button.

Import AIOWPS Settings
User Accounts
Hover your mouse to WP Security tab and click User Accounts.
WP Username Tab
This plugin detects user accounts that uses generic username “admin”. Using “admin” as your login username is a huge security hole, giving opportunity for hackers to perform Brute Force Login attack. When creating new user, it is a good practice to create a more secure name. Securing user login is one of the low hanging fruits that you must accomplish first.
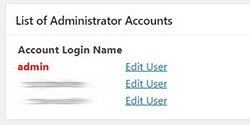
List of Administrator Accounts
By default, WordPress don’t allow you to change your username from Your Profile page. Without this plugin the only way to change your username in WordPress is through your database. You can use phpmyadmin to access your database and change your username. Another option is to use MySQL service where you need to manually SELECT your database and run UPDATE query.
By using All In One WP Security & Firewall, we don’t need to change username manually anymore since it features User Accounts settings. User Accounts settings allows you to edit username directly from WP Username tab.

Change Admin Username
Display Name Tab
Your site shouldn’t have accounts with identical login name & display name. When creating new user account, WordPress set your nickname as your username login also. So you should modify accounts with identical login name & display name.
Hackers easily guess that your nickname also act as your username login. They will just check if your nickname composed of letters with numbers or special characters. You can’t (and you shouldn’t) hide your nickname since it is everywhere from your site’s comment section for each and every blog post. If a hacker have your username login then He can just simply perform Brute Force Login attack.

Modify Accounts With Identical Login Name & Display Name
You must update the details of particular user account that has identical login & display name. Go to Users, Your Profile and scroll down until you see the nickname field. Provide a more unique nickname and hit the button Update Profile.

Change nickname from Your Profile Page
Password Tab
You don’t need to worry when creating secure password for your account. In fact, WordPress has a built in password generator. When creating new user account, you will notice that password field has already filled with secure password that is completely generated.
You may want to create password for your account on your own. Here’s a guide when creating a more secure password.
- It must be 10 characters long minimum
- It should be combination of small and capital letters, numbers and special characters
- It is a better practice to change your password at least quarterly
- You should not use the password to other accounts (if having hard time managing password, you can use password manager software)
To test how secure your password is, you can use All In One WP Security & Firewall Password Strength Tool. Go to Password tab and start typing your password from Password Strength Tool. This tool will calculate how long it will take for a high end desktop computer to crack your password.
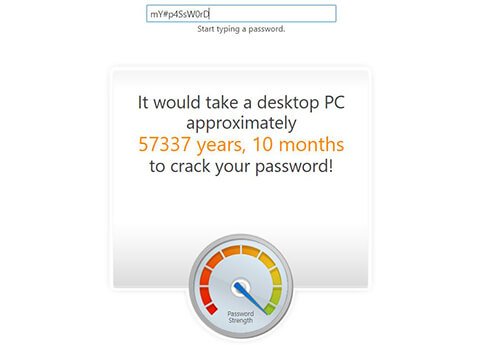
Password Strength Tool
User Login
Hover your mouse to WP Security tab and click User Login.
Login Lockdown Tab
Login Lockdown is one of our favorite feature of All In One WP Security & Firewall. This feature totally crossed out Brute Force Login attack from the list of website threats. In fact, Brute Force Login attack is what most hackers do to hack a password protected site. They use software that is capable to attempt login again and again until they guess one of your user account credential. Let’s setup Login Lockdown Configuration to block all IP addresses of devices who repeatedly failed to login.
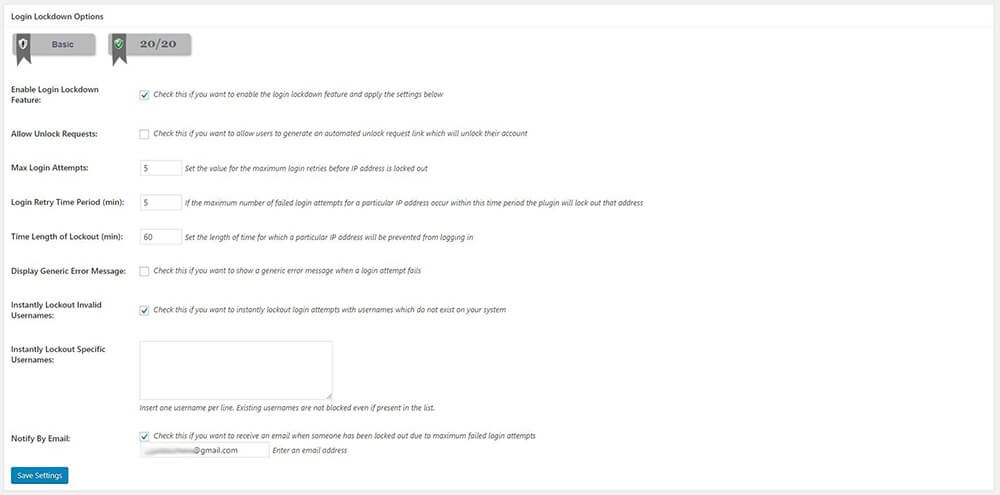
Login Lockdown Options
You may refer to this Login Lockdown Configuration.
Check Enable Login Lockdown feature before anything else.
We’ll leave Allow Unlock Request as unchecked (we don’t want any user to unlock themselves alone for security purposes).
Max Login Attempts default values is 3 (max login attempts before an IP address to be locked out). We suggest to set value here not higher than 5.
Login Retry Time Period (min). A temporary locked out of an IP Address can be happen if it fails to login 3 times (max login attempts) for this short period of time. If an IP Address locked out, your site will prevent this IP Address from logging in for this short period of time.
Optionally, you may enable Display Generic Error Message (you’ll see this from your login page when authentication failed).
Tighten your Login Lockdown feature setup by enabling Instantly Lockout Invalid Usernames.
You may also list out usernames you want to be instantly lockout by enabling Instantly Lockout Specific Usernames. From the text area, insert one username for each line.
Enabling Notify By Email is an effective way to inform us immediately if someone has been locked out while trying to login. Provide the email that will receive locked out details.
Click the button Save Settings to save your Login Lockdown Options configuration.
To view all locked IP Addresses, go to Dashboard of All In One WP Security & Firewall and look for Locked IP Addresses widget.
Login Lockdown IP Addresses Settings. Optionally, you may enable Login Lockdown IP Whitelist. List all IP addresses of your trusted user devices (from the text area, insert one IP Address for each line). Remember that IP addresses that you will enter here will never be blocked by the Login Lockdown feature.
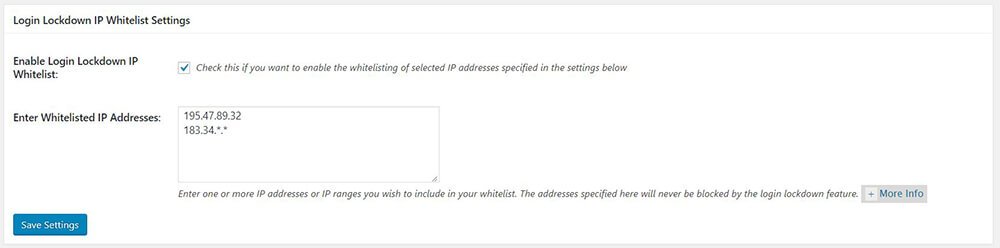
Login Lockdown IP Whitelist Settings
Click Save Settings button for the configuration to take effect.
Failed Login Records Tab
Failed Login Records tab provides helpful information that can be use when you need some security investigations. Each record shows the login IP address, user id, username and the date and time of failed logins.

Failed Login Records
You may export failed login records into CSV file by clicking the button Export to CSV.

Export Failed Login Records To CSV
You may also delete all failed login records by clicking the button Delete All Failed Login Records.

Delete All Failed Login Records
Force Logout Tab
What is the importance of this Force Logout feature? I’ll give you an example scenario. Let’s say you’re in a library, you logged in from your site to do some writing. You got thirst of coffee and decided to buy one from canteen. It will take approximately 3-5 minutes before you can get back. While you’re not around, someone’s been curious on your shiny laptop, pushed some buttons around, saw confidential data from your site, etc. Seriously, it will take just a matter of seconds for someone to crack your site using a stolen piece of data.
The purpose of Force Logout feature is to narrow the window in which a hacker has to act in order to take control of your site. Surely you’ve encounter this session expiration or session timeout from any other sites out there. This’s a basic security feature your site must have to avoid unauthorized access. Majority of browser supports session timeout and Force Logout feature let you set a short timeout on you session.
From Force User Logout Options section, check Enable Force WP User Logout. Specify number of minutes a user will be forced to login again. We recommend to set value not greater than 60 minutes. Click Save Settings.
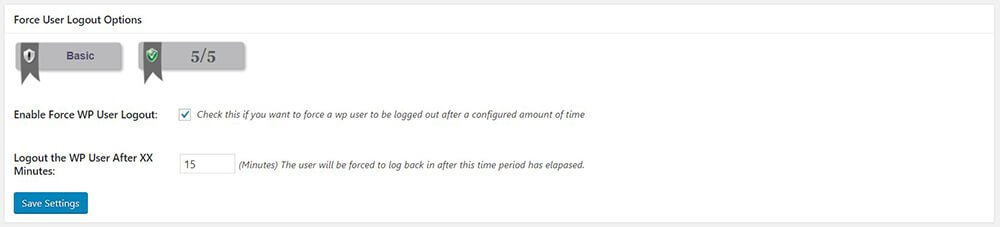
Force User Logout Options
Account Activity Logs
Account Activity Logs tab also gives helpful information that can be useful when you need some security investigations. Each record displays the user id, username, date and time of login and logout and IP address.

Account Activity Logs
You may export account activity logs into CSV file by clicking the button Export to CSV.

Export Account Activity Logs To CSV
User Registration
Hover your mouse to WP Security tab and click User Registration.
Manual Approval Tab
Why you should manually approve newly register accounts?
You have hundreds or let’s say thousands of user accounts that is currently registered on your site. Are you sure that all of them is a legit user? Are they even real human? You should be familiar to what they call registration-bots, yes, spam bots do exist since the internet was made.
You can lessen or totally eliminate fake registration by manually approving each and every user registration. From Manual Approval tab, you can enable manual approval of new registrations. This will automatically set all newly registered account status to pending.
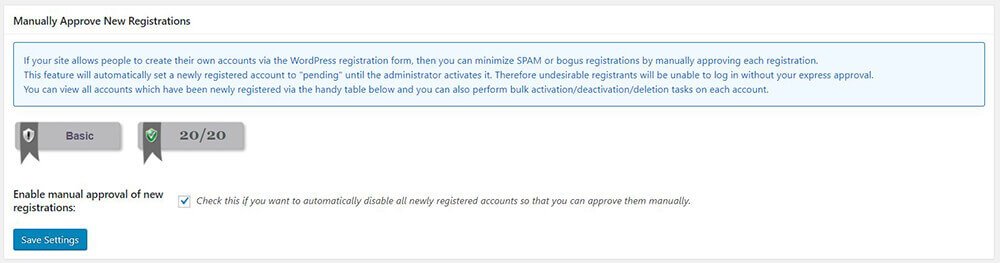
Enable Manual Approval Of New Registration
From Approve Registered Users section, you can check the details of each newly registered account. Any administrator from your site could approve those newly registered users if the registrants details looks desirable. To approve newly registered accounts, select records you want to approve, select approve from bulk actions dropdown field and hit the button apply.

Manually Approve Newly Registered Users
Registration Captcha Tab
An average web robots isn’t intelligent enough to answer captcha forms with mathematical questions. That is why putting a captcha form to a registration page is a common method to filter bots from real human.
From Registration Page Captcha Settings section, enable captcha from registration page. This feature will add captcha form on the WordPress user registration page. Click Save Settings button for the feature to take effect.

Enable Captcha On Registration Page
Registration Honeypot Tab
Honeypot is also a very good security technique to detect whether a registration was performed by a human or a bot. Honeypot mechanism is simple, it adds hidden field from your registration form. Hidden field will not be visible to humans, only robots could see it. Web robots commonly fill up every input field it sees from a form (surely it will also fill up our honeypot field, our trap). When the form submitted, this plugin will easily know if the registration is performed by a human or just a spam bot. If a spam bot detected, this plugin will not allow it to register and redirect it to home page.
From Registration Honeypot Settings section, enable honeypot on registration page then click Save Settings button for the feature to take effect. Now you have added another security feature from your registration page.

Enable Honeypot On Registration Page
Database Security
You should be aware that a WordPress site store almost all of its data in the database. Your database stores information such as your pages and posts, all content you have written, theme settings and even your site’s configuration.
When you check your database tables, you’ll notice that each table name has a prefix of “wp_”. Millions of users use WordPress not knowing that they all use the same set of tables (same structures and even names). That is simply not secure. That vulnerability happens to be one of the most common target of hackers. Hackers could just easily attempt to make SQL injections to your site, change your site’s configuration through the database and completely take control of your site. People behind of All In One WP Security & Firewall already know those kind of vulnerabilities. They’ve already added this change DB Prefix feature. DB Prefix options will simply change table name prefix from “wp_” to something else.
DB Backup Tab
You should backup your database first before changing table prefixes. From Database Security page, navigate to DB Backup tab. Click the button Create DB Backup Now. DB Backup will simply create zip
of your database backup and store it to your /wp-content/aiowps_backups/ folder. You may use FTP solutions such as FileZilla to download your database backup to your local computer.

Create Database Backup Manually
With DB Backup feature, you also have an option for automated scheduled backups. From Automated Scheduled Backups section, enable automated scheduled backups. You can change Backup Time Interval from the default 4 weeks value to something else. Backup Time Interval is the frequency the plugin will automatically backup your database. Number of Backup Files To Keep field allows you to set number of how many database zip file will be kept in your backup folder. You should also checked Send Backup File Via Email so the plugin will send you email right after it performs DB backup. DB backup itself is attached from the email.
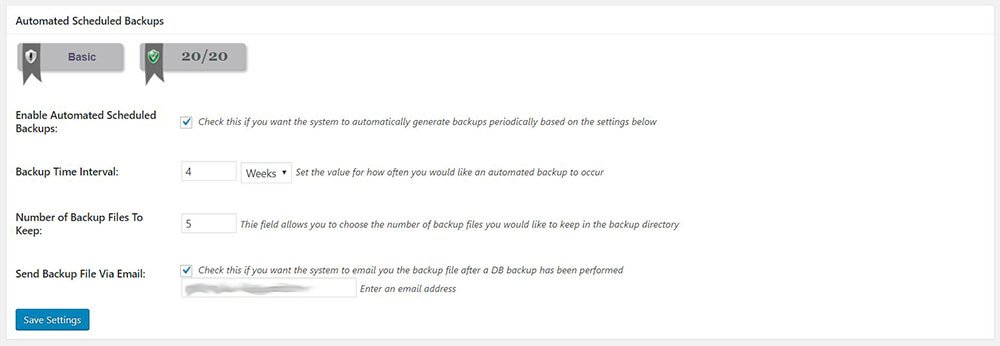
Enable Automated Scheduled Backups
DB Prefix Tab
After backing up your database, go back to DB Prefix tab. From DB Prefix Options section, you may enable Generate New DB Table Prefix or choose your own DB Prefix. We’ll enable Generate New DB Table Prefix in this example (We want the plugin to generate a random 6 character string for the table prefix). Click the button Change DB Prefix for settings to take effect.
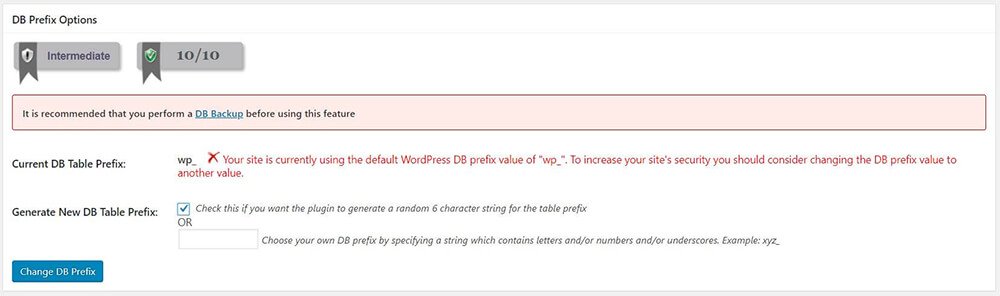
Generate New DB Table Prefix
Filesystem Security
Hover your mouse to WP Security tab and click Filesystem Security.
Why you should secure files of your site?
Let’s have a little scenario here. If someone got your host FTP access details, He could easily connect to your web server. He can locate your site folder and modify its core files without your permission. He could either take control of your site or hijack it then ask you for a ransom. That happens when you fail to secure files of your site. Even if He’s not a hacker, directly accessing and modifying files of a live site most often cause a disaster. You should prevent updating WordPress core files unless it is really needed and more importantly you permits it.
File Permissions Tab
All In One WP Security & Firewall scans WordPress files and directories, highlights insecure files in terms of permission settings. This plugin can simply improve the overall security of your site by setting recommended file and folder permissions. From WP Directory and File Permissions Scan Results section, set recommended permission of each highlighted files by clicking the button Set recommended permission.
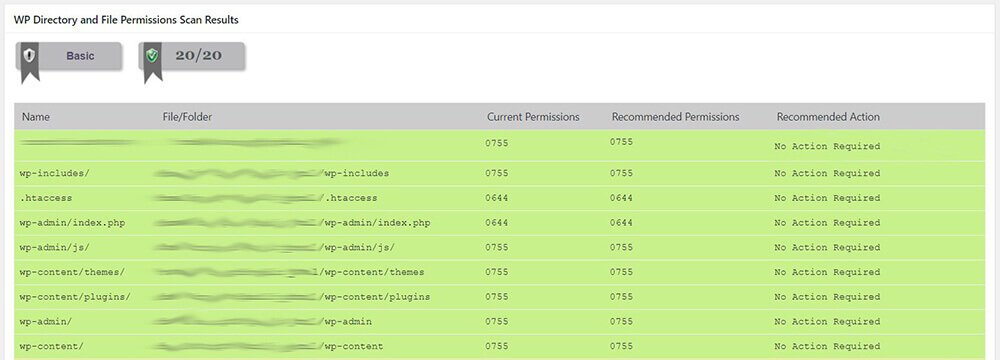
WP Directory And File Permissions Scan Results
PHP File Editing Tab
By default, WordPress let you edit some of your files from Editor‘s page under Appearance. From Editor‘s page you can directly edit theme files such as templates, functions and the stylesheet.
The team behind this plugin knows that it is crucial to disable PHP file editing within your WordPress dashboard. This plugin has this feature of disabling ability to edit PHP file thus PHP is very powerful script that could be use by a hacker to execute harmful codes.
From Filesystem Security page, navigate to PHP File Editing tab, you should see Disable PHP File Editing section. Check Disable Ability To Edit PHP Files to remove the ability for anyone to edit PHP files from WP dashboard. Click Save Settings button for changes to take effect.
WP File Access Tab
Enabling this feature allows you to prevent access to files such as readme.html, license.txt and wp-config-sample.php which are delivered when you install WordPress.
readme.html – includes WordPress guide such as the famous 5-minute install, steps for updating and migrating WordPress, system requirements and some remarks.
license.txt – WordPress released under GNU General Public License, it is open source and 100% free that is why it has a license.
wp-config-sample.php – contains confidential data of your site such as database details and other vital informations.
Those files above provide pieces of information that could give clue/s to potential hackers. To hide those information, navigate to WP File Access tab, you should see Prevent Access to Default WP Files section. Check Prevent Access to WP Default Install Files to hide confidential information of your site. Click Save Settings button.
Host System Logs Tab
PHP stores each and every error or warning it encounters to a file called error_log. Log file location may differ on the host you are using (if you’re using apache2 module then error_log is locates at /var/log/apache2). From Host System Logs tab, you can view the latest entries of error_log file.
To view latest entries of error_log file, go to View System Logs section and click the button View Latest System Logs.
WHOIS Lookup
Hover your mouse to WP Security tab and click WHOIS Lookup.
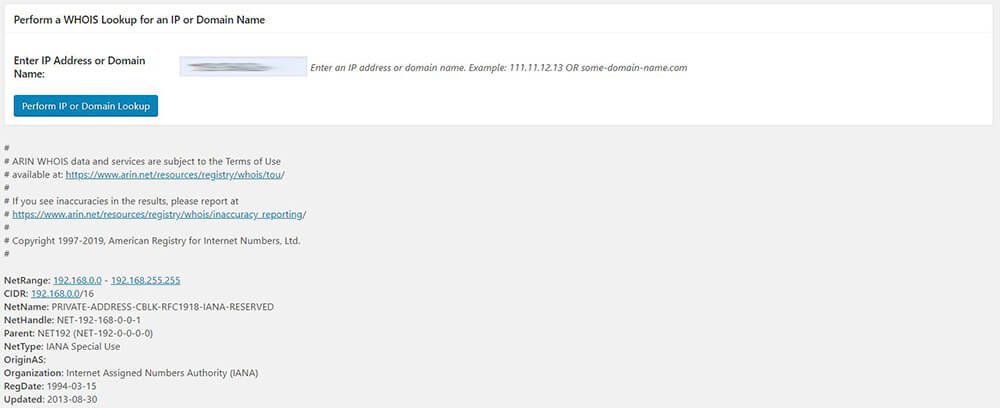
With WHOIS Lookup feature you will be able to look up more detailed information about an IP address or domain name.
This feature would be helpful for some cases such as getting detailed information of a locked IP Address.
From Perform a WHOIS Lookup for an IP or Domain Name section, enter IP address or a domain name and hit the button Perform IP or Domain Lookup button. You should see detailed information of the IP or Domain such as NetRange, CIDR, NetName etc.
Perform a WHOIS Lookup for an IP or Domain Name
Blacklist Manager
Hover your mouse to WP Security tab and click Blacklist Manager.
Blacklist Manager feature allows you to list out specific IP addresses or ranges and also user agents you want to prevent accessing your site.
This feature won’t let banned users (IP addresses or user agents matching those on your list) to access your web host.
Blacklisting of certain IP addresses or ranges and user agents (first security defense of your site) let you stopped potential attackers to even perform an initial attack.
From IP Host and User Agent Blacklist Settings section, check Enable IP or User Agent Blacklisting. Enter IP addresses or ranges from IP Addresses textarea (insert one IP address or ranges for each line). Right after the IP Addresses field you will see User Agents textarea. User Agents textarea also accepts single user agent for each line.

Enable IP or User Agent Blacklisting
Firewall
Hover your mouse to WP Security tab and click Firewall.
Basic Firewall Rules Tab
All In One WP Security & Firewall Basic Firewall Rules feature allows you to enable basic firewall protection to your site. This’s one of the basic features you should enable from your site thus this will not affect your site’s overall functionalities.
From Basic Firewall Settings section, check Enable Basic Firewall Protection. Basic Firewall Protection will implement the following:
- Secure your .htaccess file by denying access to it.
- Disable the server signature.
- Set limit of file upload size to 10MB only.
- Secure your wp-config.php file by denying access to it.

Enable Basic Firewall Protection
Next, scroll to WordPress XMLRPC & Pingback Vulnerability Protection section, check Completely Block Access To XMLRPC to completely block external access to XMLRPC.
Why should we disable XMLRPC?
XMLRPC is built in feature of WordPress. It is a PHP file (xmlrpc.php) residing inside of WordPress that enables data transmission through HTTP with XML as the encoding mechanism. It simply enables remote access to your site. If you’re outside and you don’t have your computer, you could still access your site through your phone because of this feature. Wouldn’t that be helpful? Yes, that would be very helpful but XMLRPC feature has some serious security vulnerabilities. Leaving XMLRPC enabled make your site prone to Brute Force Attack. Another security hole of XMLRPC is DDOS Attack, making your network resource unavailable, in short, taking your site offline.
XMLRPC vulnerabilities make the feature itself a security hole instead of a solution. You should justify XMLRPC’s upside and downside and only enable XMLRPC if you understand the risk of having it activated.
Here we’ll check Completely Block Access To XMLRPC to totally block external access to XMLRPC. We will also check Disable Pingback Functionality From XMLRPC in case there’s a need for us to use Jetpack or WP iOS or other apps which need WP XML-RPC feature. Disabling pingback functionality from XMLRPC will protect your site from WordPress pingback vulnerabilities. Click the button Save Basic Firewall Settings to save your changes.

WordPress XMLRPC & Pingback Vulnerability Protection
Additional Firewall Rules Tab
Listing Of Directory Contents
Check Disable Index Views feature. Why we should disable index views in our site? Let’s say you have created a folder inside of your site root directory and you forgot to create an index file inside of it. When you access that folder from your browser, you will only see list of folder and files. If an expert on web saw your directory listing, it is easy for them to determine which framework your site is using. Disabling listing of directory contents doesn’t really make your site more secure but at least it will not list your folder and files in a single request.

Disable Index Views
Trace and Track
Check Disable Trace and Track feature. HTTP Trace/Cross-site tracing (XST) is a form of Cross-site scripting (XSS) attack that is known of its capability to get HTTP header information (including cookies) of web users. We shouldn’t belittle this old type of attack thus it is still effective on stealing victims web credentials.

Disable Trace and Track
Proxy Comment Posting
Enable Forbid Proxy Comment Posting. This feature will deny any requests from a proxy server when posting comments. Spammers commonly use proxy server when they make spams or spam bots. Why? Proxy server simply hides their real IP address. It encrypts their data before it send request to your web server and still your web server will return the correct response. Proxy server itself isn’t bad or harmful in its way thus people use it to control their network. They use it to save bandwidth and improve internet speed, setup security and many more. Still, proxy server is the most fitted machine for intruders to create spams. By enabling Forbid Proxy Comment Posting, you’re eliminating some spam and other proxy requests.

Forbid Proxy Comment Posting
Bad Query Strings
Enable Deny Bad Query Strings feature. When navigating to your site, you will notice that sometimes your URL contains a query string (ex. http://www.yoursite.com/contact?query=foo&query2=). With that kind of URL format, an attacker could just change query string or change query value. An attacker could perform XSS attack if you don’t properly use your query. Other WordPress plugins use query string so make sure they properly sanitize query values. Enabling Deny Bad Query Strings give your site protection against malicious queries via XSS.

Deny Bad Query Strings
Advanced Character String Filter
Check Enable Advanced Character String Filter feature. This feature will protect your site from malicious string attacks coming from XSS. Advanced Character String Filter will simply detect malicious string patterns and will return 403 error for the attacker attempting XSS attack.

Enable Advanced Character String Filter
6G Blacklist Firewall Rules Tab
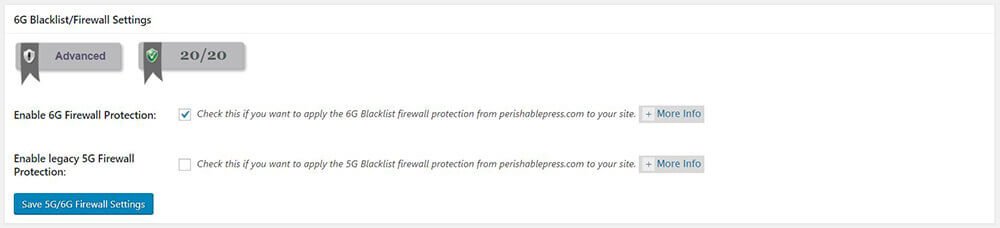
What is 6G Firewall?
6G Blacklist Firewall (simply known as 6G Firewall) is designed and created by Perishable Press to improve 5G Blacklist Firewall. It is a server-level security designed to protect site’s from wide variety of malicious URI requests, harmful web robots, and other type of attacks. With this well scrutinized .htaccess directives, your site will have the capability to block bad traffics and reduce server load that will drastically improve the overall performance and security of your site. 6G code will be added to your site’s .htaccess file when you enable 6G Firewall Protection. Read more about 6G Firewall here.
5G Firewall, a legacy firewall released on 2010, the early version of 6G Firewall. 5G Firewall still was designed and created by Perishable Press. Both 6G and 5G security firewall consist of the following security protection (though it is given that 6G version is improved and much better).
- Blocks forbidden characters that is commonly used in exploitative attacks.
- Also blocks malicious encoded URL characters like “e.g. .css(“.
- Protect your site from common patterns and specific exploits in the root portion of targeted URLs.
From 6G Blacklist/Firewall Settings section, check Enable 6G Firewall Protection. Click the button Save 5G/6G Firewall Settings after making the changes. In our experience, leaving 5G and 6G Firewall both enabled somehow result to problem on rendering image. In our opinion, it is better to leave 5G Firewall as unchecked and only enable 6G Firewall for your site.
Enable 6G Firewall Protection
Internet Bots Tab
Internet bot also known as web robot is a software created basically to perform repetitive task in the internet. You must heard the term “Web crawling”, this is where web robots are most commonly known. In web crawling, web crawler analyze the entire site, its content (both text, image etc.), it may get the details of the web framework you’re using and the version of it. An example of a web robot is Googlebot, created by google, it crawls and understand your site and give you meaningful reports. That would be great right?
Not all web robots are created to help you. There are also bots out there in the internet that is created to harm your site. Just like what we have stated earlier, malicious bots created since the internet was made. You can’t do anything to stop the making of harmful bots.
All In One WP Security & Firewall developed a functionality to filter harmful bots from helpful bots (specifically Googlebot). This feature will detect if the User Agent information of a bot contains the string “Googlebot”. It will also run a few tests to verify if the bot is legit and really from Google. Bots that will fail the test will be marked as being a fake Googlebot and will be blocked. From Block Fake Googlebots section, check Block Fake Googlebots and hit the button Save Internet Bot Settings.

Block Fake Googlebots
Prevent Hotlinks Tab
From Prevent Hotlinks section, check Prevent Image Hotlinking. Why would you need to prevent hotlinks? Let’s say someone’s reading from your blog and He saw a beautiful and unique image from your page. He decided to copy the image URL from your site, publish it somewhere else in the internet and share it to people without your notice. Each time someone view the page (with the hotlinked image from your site), your web server do the hard work to load that image, eating your bandwidth, that will negatively affect your server performance.

Prevent Image Hotlinking
404 Detection Tab
404 error is an HTTP code received by the client computer when requesting for a particular resource that doesn’t exist from the web server. Usually it occur when the resource was deleted or moved (but link to that resource haven’t updated), the server is down or offline, or maybe the URL was just typed incorrectly. Mistyping a URL is a normal behavior, however you may notice many repeated 404 errors that happened in a relatively short span of time and from the same IP address attempting to access a non-existent URL. That one is not normal, that could be an attacker or a bot trying to find particular page for sinister reasons.
From 404 Detection Options section, check Enable 404 IP Detection and Lockout to enable the lockout of selected IP addresses. This feature will log all 404 errors and will allow you to blocked IP addresses from a specified time. Time Length of 404 Lockout (min) field let you set time (in minutes) for which a blocked IP address will be prevented accessing your site. Set number in minutes not less than 60. Provide URL to 404 Lockout Redirect URL field (127.0.0.1 or localhost is the default value), blocked user will be redirected to this location. Click the Save Settings button to save your configuration.

Enable 404 Detection and Lockout
404 Events Logs section will list all 404 events on your site. This would be helpful for you to analyze which string URL often 404 error occur and which IP’s attempting to access it. You may block specific IP address from the table list by hovering to particular row, Temp Block/Blacklist IP link will show. Click any of the two options if you want to temporary block or completely blacklist the user.
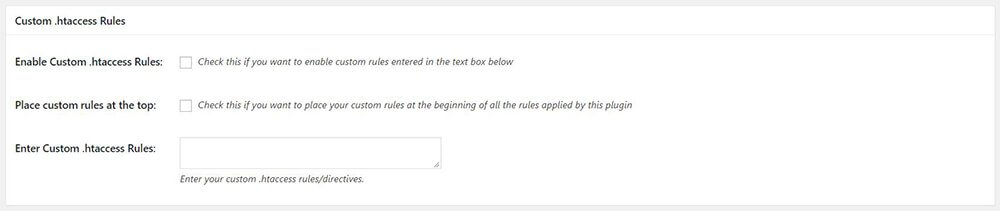
Custom Rules Tab
Before adding your own .htaccess rules, you must backup your .htaccess file first. From Settings, go to .htaccess tab. From Save the current .htaccess file section you will see a button Backup .htaccess file. Hit the button and your .htaccess file will be saved in /wp-content/aiowps_backups folder.
As we have stated earlier, .htaccess file is a configuration file we use to alters Apache’s configuration. When enabling/disabling security features, this plugin simply add/edit/remove rules/directives to your .htaccess file. Custom Rules tab allows you to add your own custom .htaccess directives; very useful if want to tweak existing rules. You should be completely aware of the custom rules you want to add to your .htaccess file thus it may break your site’s functionalities.
From Custom .htaccess Rules section, check Enable Custom .htaccess Rules for you to be able to add your own directives. You can place your custom rules at the beginning of all existing rules by checking Place custom rules at the top. From the textarea, enter your custom .htaccess rules/directives. Click the button /Save Custom Rules when you’re done.
Enable Custom .htaccess Rules
Summary Of All In One WP Security & Firewall
Setting up WordPress security can be intimidating at first. You may struggle specially when you’re new to website security field. Again there’s no need to worry thus WordPress security guide like this can be found easily anywhere in the internet. WordPress security is one of the major things you need to focus on.
Because of WordPress popularity it doesn’t only attracts people and business, it also attracts website hackers. Hackers continuously creating various kind of malware to hijack websites of any kind. WordPress itself is secure, the team behind this framework never stop releasing security updates. However, you should still be aware of the common web attacks and add security to your own site.
Thanks to Tips and Tricks HQ team (Peter Petreski, Ruhul, Ivy) for creating All In One WP Security & Firewall for WordPress. The team behind this plugin listed the good security practices and techniques and developed a high quality WordPress security plugin. Just like what we have stated earlier, this plugin simply write rules to your .htaccess file (so you don’t need to manually write those). For more information about this security plugin you can read All In One WordPress Security and Firewall Plugin comprehensive guide here.
All in all, here’s the most vital features of All In One WP Security & Firewall:
File Protection
- Filesystem Security feature for you to set recommended permission for your directory and files, protect your PHP files and hide confidential files (readme.html, license.txt and wp-config-sample.php)
- Backup and protection of your .htaccess and wp-config-file.php
Database Security
- You are able to backup your database with a single click with DB Backup feature
- DB Prefix will generate unique DB Table Prefix for you
User Account Security
- Login Lockdown feature, an effective protection against brute force login attack
- Force Logout feature to dyncamically set time in minutes for session timeout
- Manual Approval of new Registration to set all newly registered account status to pending
- Registration Captcha and Registration Honeypot for web form protection
- Detects vulnerabilities (e.g. generic username “admin” and identical login name & display name)
- Password Strength Tool will help you to create a secure your password
Monitoring
- Get detailed information of a specific IP address or domain using WHOIS Lookup (for security investigations)
- Logging system – Account Activity Logging (from User Login tab) and Host System Logs (from Database Security tab) for you to track various events that happens in your site.
Firewall Protection
- 6G Blacklist Firewall will protect your site from malicious URI requests, spam robots, and other type of attacks
- Protects your site from Cross-site scripting (XSS) – Bad Query Strings give your site protection against malicious queries via XSS. Advanced Character String Filter protect your site from malicious string attacks coming from XSS
- XMLRPC & Pingback Vulnerability Protection feature will block external access to XMLRPC
Other helpful features of All In One WP Security & Firewall are
- Hide meta data of your site
- Hide directory listing and contents feature
- Set limit of file upload size
- Detects Fake google bots
- Prevent Image Hotlinking
- Blacklist Manager to blacklist set of IP addresses and users
Anytime you may disable all security features and firewalls from Settings tab. Above all, this plugin also has Import/export settings that you have configured.
Napsat komentář